Monday, June 11, 2012

Zebra Print Eye Makeup♥


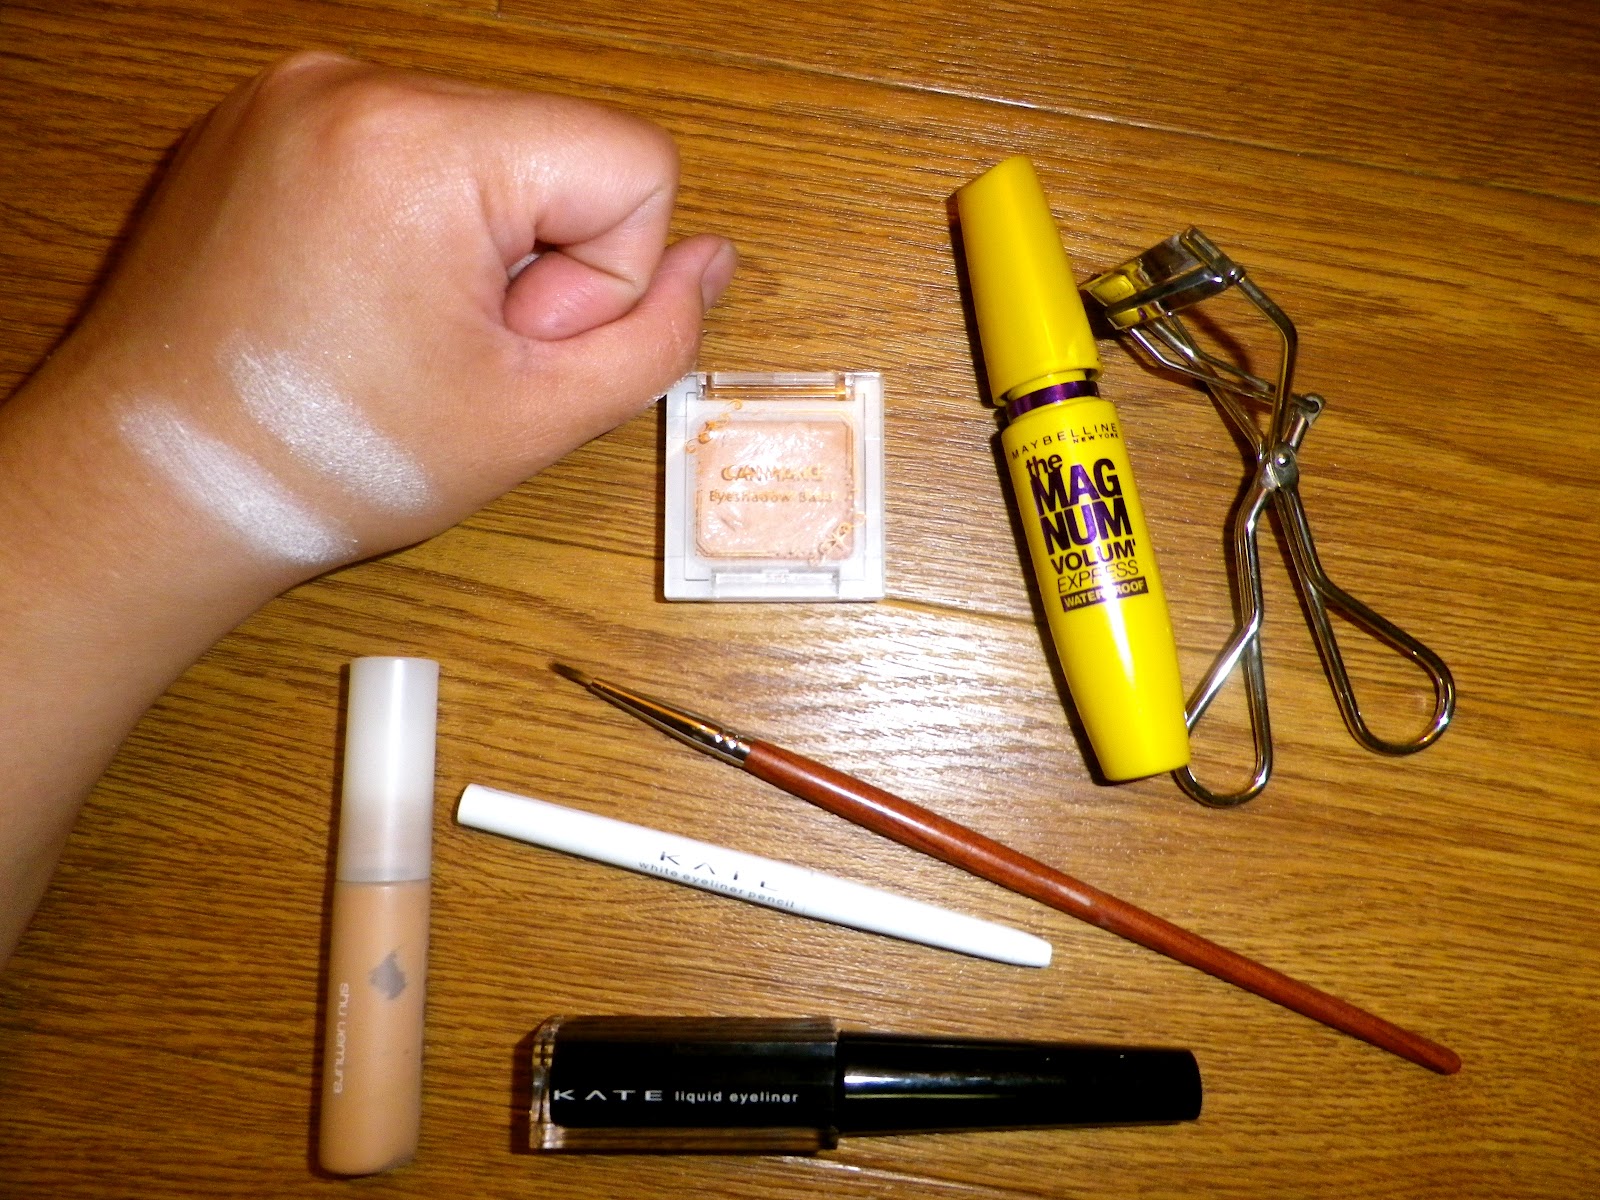
What You Will Need: Eyeshadow Base, Concealer, White Creamy Eyeliner Pencil, Matte White Eyeshadow, Shimmery Milky White Eyeshadow, Thin Eyeliner Brush, Black Liquid Eyeliner, Eyelash Curler, Black Mascara, Black Eyeliner Pencil (not included in the picture) and Dramatic False Eyelashes (optional)

Zebra Print Eye Makeup
  1. Apply Eyeshadow Base or Eye Primer all over your eyelids and crease area.(you know the drill!;P)
  2. Conceal your dark circles with concealer.
  3. Apply matte white eyeshadow all over your eyelids and crease area and all the the way up to your brow bone.
  4. Top the matte white eyeshadow with shimmery milky white eyeshadow. Blend well with a blending brush.
  5. Here`s the fun part!  Using your liquid eyeliner, draw zebra stripes alternating to start from the inner sides and outer sides of your eyelid and crease area. Drawing zebra stripes is just like drawing uneven rugged lines. Imagine stream lines.  Click on this link to learn how to draw zebra stripes. http://www.dragoart.com/tuts/4002/1/1/how-to-draw-zebra-stripes.htm
  6. Use a thin eyeliner brush to fill in more zebra lines. Make sure to do this on one eye first before the other and wait for the black eyeliner to dry before you open the eye you just worked on.
  7. Repeat directions number 5 and 6 on the other eye.
  8. Line your upper lash lines with black liquid eyeliner. Create a winged eye effect. You can draw longer winged lines to make it blend with the zebra stripes.
  9. Line your upper and lower waterlines with black eyeliner pencil. Smudge the black eyeliner on your lower lash lines too.
  10. Curl your lashes and put on your black mascara. You can also add false eyelashes for a more dramatic effect.  Define and shade your eyebrows with your choice of eyebrow pencil and voila!:D You can now flash your fierce animalistic look at the club, on your social network profile picture ;P, animal cosplay perhaps?;P (lol!), Halloween party, parent and teacher meeting at your child`s school! ;P (just kidding! lol!) or just any fun events where you can wear this look!:D Enjoy!:D


Leopard Eye Makeup on my friend Yuri ( isnt she gorgeous and beautiful?!:) ) and Zebra Eye Makeup on me.:)
Thank you to my friend Yuri for letting me touch her face and try the leopard eye makeup on her!:) Love you Yuri-chan dai dai!:D  lol!:D   ( Leopard Eye Makeup Directions in on my past blog! Check it out!:D )

Sunday, June 3, 2012

Grey/Silver and Black Smokey Eyes.


Products Used

Eyeshadow Base, Black Gel Eyeliner, Black Eyeliner Pencil, White Eyeliner, Eyebrow Pencil, Eyelash Curler and Black Mascara

Eyeshadow Colors: Milky White, Light Grey/Silver, Shimmery Black and Champagne White Colored Eyeshadow.

Blush On: Soft or Natural Pink ( The pink squares on the palette and the one below the swatched lipstick color)  and Bronzer (The brownish squares)    Lipstick: Mauve ( Purplish Rosy Pink Colored Lipstick)


How To Create a Grey/Silver Smokey Eyes Look
  1. Put on your foundation and conceal the dark circles in your eyes. Pat loose powder on the under eye areas where possible eyeshadow fallouts could fall. 
  2. Apply eyeshadow base all over your lids and followed by applying the milky white eyeshadow to set the eyeshadow base and to intensify the grey/silver eyeshadow colors.
  3. On your inner lids and crease area dab a generous amount of grey/silver eyeshadow, blending it up to the middle part of your lids and middle crease. 
  4. On the outer edges ( V-corners) of your eyelids, apply the shimmery black eyeshadow. Concentrate on shading the corners darker and blend it upwards, bringing the color towards the upper crease area or simply shading your eye sockets.   
  5. With a blending brush, blend any harsh edges and the two colors but make sure to keep the inner eyelids  lighter than the outer V-corners of the eyes.
  6. Apply a champagne white colored eyeshadow on your brow bones to add light on your eyes and to soften the edges of the darker colors. Blend it well with the colors below it.
  7. Line your lash lines with a black gel eyeliner. Create a thin winged eye look.
  8. Sweep a little amount of shimmery black eyeshadow just under your lower lash lines up to the middle part only. Then on the inner lower lash lines sweep a small amount of light grey/silver eyeshadow, connecting it to the black shimmery eyeshadow.
  9. Line your waterlines and tear ducts with white eyeliner.
  10. Tight line your upper lash lines with black eyeliner pencil.
  11. Curl your lashes and apply black mascara. ( You can also apply dramatic false eyelashes if you want.)
  12. Define your brows and sweep off the loose powder under your eyes with a brush,  preferably with a fan brush.
  13. Contour your face with a bronzer and highlight parts of your face where you want to bring forward using a highlighter.
  14. Sweep a natural/soft pink blusher on your cheeks.
  15. Line your lips with a lip liner  and apply your favorite nude, creamy or matte lipstick. Avoid intense colored, frosted or shimmery lipsticks with this look.  And your done! ;D

Grey/Silver and Black Smokey Eyes Look


Tuesday, May 29, 2012

Simple Brown and Shimmery Pink Eye Makeup

What You Will Need:
 Eyeshadow Base, White eyeshadow, ShimmeryBrown Eyeshadow
 Light Shimmery Pink Eyeshadow
 Black Gel Eyeliner, Black Eyeliner Pencil

 Foundation,  Concealer,  Brightener Pen,  Contouring Powder,  Highlighting   Powder , Pink  Lip Gloss
How To:

  1. Apply eyeshadow base then white or cream colored eyeshadow all over your lids and crease area.
  2. Apply brown eyeshadow starting on your outer V or outer edges, bringing the color up to your upper crease area and all the way to your inner crease. Make sure to leave a space at the middle part of your crease and eyelids. Sweep the left over brown eyeshadow from your brush on your lower lash line.
  3. On the unshaded part of your eyelids and crease area, apply a light shimmery pink eyeshadow. Do not over blend the brown and pink eyeshadow.  Just blend the area where the two colors meet.
  4. Line your upper lash line with a black gel eyeliner. Creating just a simple lined eyes look. ( No winged eye lines this time. ;p )
  5. Line your waterline with black eyeliner and tight line your upper lash line/waterline too.
  6. Curl your lashes and apply black mascara on your upper and lower lashes.
  7. Put on your foundation and conceal any dark spots especially the under eye area.
  8. Define and shade your eyebrows with your choice of eyebrow pencil.
  9. Brighten the dark areas of your face using a brightener pen. (edges of your nostrils, sides of brow bone,  cupid`s bow and edges of your mouth.)
  10. Set your foundation and concealer with loose powder.
  11. Contour and define your face with shading powder and shading brush.
  12. Sweep a light pink shade of blush on just above your cheek bones. Do not apply blushers exactly on the apples of your cheeks. The color will make your face look dragged down if you do that.
  13. Highlight the top part of your nose, chin, forehead and the upper part of your cheeks.  Just above where you applied your blush on.
  14. Apply a light pink lipgloss or lipstick and youre done! ;D
(Products that I use that are not included in the above pictures are loose powder, eyebrow pencil, pink blusher and black mascara.)

Simple Brown and Shimmery Pink Eye Makeup


Monday, May 21, 2012

Toxic Yellow and Green Makeup plus DIY Yellow Lipstick


For The Eyes

  1. Apply a creamy white eyeliner or eyeshadow all over the lids and crease area to intensify the yellow and green colors.
  2. Top white powder eyeshadow to set the cream white eyeshadow and to prevent creasing.
  3. Apply a matte bright yellow eyeshadow on your inner eyelids, bringing the color up to the crease.
  4. Next apply a bright lime green eyeshadow on the middle lid and crease area. Blend the yellow and green color.
  5. On the outer lid and crease area apply a darker lime green color. Blend it with the yellow and bright lime green eyeshadow.
  6. Line your upper lash line with gel or liquid eyeliner, creating a winged eye effect.
  7. Line your waterline with black eyeliner pencil and tight line the inner upper lash line.
  8. With a small eyeshadow brush or a q-tip sweep a small amount of the bright green and yellow eyeshadow on the lower lash line, just under your waterline. Smudge and blend the colors well.
  9. Curl your lashes and apply black mascara.
  10. Define your brows with your choice of eyebrow pencil.
DIY Yellow Lipstick
  • Scrape yellow eyeshadow and mix it with a small amount of colorless lip balm or petroleum jelly in a small container. Mix and blend the mixture well with a lip brush. You can add up more scraped yellow eyeshadow until you achieve the desired yellow color that you want.  Test and try it on! ;D 

Thursday, May 17, 2012

How I Eat Alien Eggs ( How I Simply Eat Natto )

       Natto is a traditional Japanese food. It is basically fermented soy beans and its usually eaten for breakfast. Many people mostly foreigners don`t like natto because it has a very strong smell, the texture is slimy and it  really looks like alien egg sacs!  But surprisingly natto really tastes good especially when you`re used to eating it already and when you know how you`re going to eat it your way.  Natto is also rich in protein and a very healthy food.  Here is how I simply eat my alien eggs!;P 

        
       A pack of natto contains a small packet of karashi  mustard sauce and a dashi based sauce.  I don`t like karashi  so I discard it or give it to my husband because he likes his natto with karashi mustard.  I only  use the dashi based sauce.

       
       After I mix in the dashi sauce, I sprinkle a pinch of sugar on my natto.

       
       Next, I start mixing the natto, dashi sauce and sugar until the texture becomes thick and slimier. Disgustingly slimier, the better!;D When the natto turns to my desired texture, that`s when I know it`s ready to eat. 

       Here`s how I want my desired natto texture to look like. ;) 


       Sometimes, I eat natto by itself but most of the time I like to top it on a bowl of white rice. :D Im now ready to eat these alien eggs! Itadakimasu! ;D

      There are a lot of ways to eat natto. I even sometimes add raw egg in it and I know someone who likes to eat natto with white bread! lol ;D  How do you eat natto?  Feel free to comment your style on how to eat alien eggs below! ;D 


Wednesday, May 16, 2012

Animal Print Eye Makeup (How to)

Leopard/Animal Print Eye Makeup 
  1. Apply eyeshadow base or eye primer.
  2. Apply orange eyeshadow all over your eyelids and crease area.
  3. Top the orange eyeshadow by applying gold eyeshadow over your eyelids, crease area and up to the brow bone. Blend the two colors well with a blending brush.
  4. With a black liquid eyeliner, draw animal (cheetah or leopard) prints on your eyelids, crease area and all the way up to the brow bone. Its just like drawing broken little circles and you dont have to make it perfect.
  5. Fill-in or shade the spaces inside the animal prints with copper eyeshadow.
  6. Line your upper lash line with black liquid eyeliner and create a cat eye effect.
  7. Line your waterline with black eyeliner pencil and tight line the top underside of your eyelashes.
  8. Apply gold eyeshadow on your lower lash line just under the black eyeliner.
  9. Curl your lashes and apply black mascara.
  10. Cut a piece of false eyelashes in half. Then top each half on both left and right outer corner of your lash lines.
  11. Define your brows with a dark colored eyebrow pencil or eyebrow powder. Blend well.
  12. Contour your face with a contouring powder or bronzer.
  13. Apply a coral shade blush on your cheeks.
  14. Highlight the top area of your cheek bones, nose, forehead and cupids bow.
  15. Apply your desired lipstick color. ( Mine is a brownish orange-red lipstick)
Note: Foundation and concealer (for under eyes) can be applied first before doing your eye makeup or after doing your eye makeup to prevent eyeshadow fallouts.


Leopard Print Eye Makeup on my gorgeous friend, Yuri. :)

Saturday, May 12, 2012

Unleash Your Dark Side with Goth Makeup

Stylish Goth Look

On Natural Bathroom Lighting. ;P  lol


Unleash The Goth in You

Im a fan of gothic looks since I was in high school. That explains why I love black and dark makeup. I just never had the guts to go goth all the way because of the shock value it gives to people when they see you walking around wearing the look. LOL;P Im also that shy...;P  But thanks to makeup I could be anything I want to be even at home!;P  Here`s how to make this look.


  1.  Apply black eyeshadow all over your lids and crease area.
  2. Line your lids and waterline with black kohl eyeliner and make a dramatic winged line. 
  3. Apply red eyeshadow on the upper crease area, just above the black eyeshadow and lower lash line . Blend the colors with a blending brush.
  4. Curl your lashes and apply black mascara.
  5. Define your brows and shade it with black eyebrow pencil. Blend.
  6. Apply light foundation all over your face and neck.
  7. Line and shade your lips with black eyeliner.
  8. Apply red lipstick and blend it well with your black shaded lips using a lip brush.
  9. Contour your face and nose with contouring powder to have a strong and defined look.
  10. Let your hair down. Try not to smile and take a picture of you..... Tadaaaaaah! Your goth side has been unleashed!;D
( You can absolutely just wear black or any dark lipstick, I dont have one thats why I just mixed black    eyeliner and red lipstick together to have black lips. )